Showing posts with label gift ideas. Show all posts

Friday, May 1, 2015

High Five for Friday

Hello there! Today I'm linking up Jennie to share some of my favorite stuff from the past week.

1) Last Friday, Grant got to spend the day at his Gramma & Grandpa's. Since Husband I would be out late for the concert, Grant just spend the night Thursday and then all day on Friday. He had a lot of fun and we all met at IHOP that evening for dinner and to pick up Grant. That's where he got to show off his new hat from Gramma & Grandpa (and eat up all the compliments he got at the restaurant).
He's requesting cowboy boots now.
We even got Husband to try it on :)
2) I made a blanket! With my sewing machine. Most of you may not know what a huge accomplishment that is for me, made even bigger by the fact that I really didn't throw any hissy fits during the process. Not only have I never made a blanket with my sewing machine, but I've also never used my sewing machine without having an absolute meltdown over how awful I am at sewing (or stabbing myself several times with pins - no tears and no bandaids make this quite a success for me!). I'm looking forward to gifting my craftiness :)


3) We have a lot of birds in our backyard and my favorites are the cardinals. I love to watch them when they get brave enough to hang out on the deck and every once in a while, I manage to get a picture.


4) This week I shared a fun little Teacher Appreciation gift idea (Teacher Appreciation Week is next week - thank a teacher!).


5) Costume day at school! 


6) Dinosaurs, dinosaurs, dinosaurs! The boy is obsessed. The Land Before Time (classic!) doesn't doesn't leave the DVD player anymore and we watch it several times a weekend. And recently discovered the TV series is on Amazon Prime and Grant has become a fan of that too. I think he has a hard time believing that Husband & I watched that movie as kids too. And the dinosaur book he got for Easter is read a lot. One night before bed we read it cover to cover (this is not a small book people!). Me reading the book, Grant telling me if the one on the page was a plant or a meat eater. He LOVES dinosaurs!
The one millionth showing of The Land Before Time
Reading the huge dinosaur book
Happy Friday everyone!
Have a great weekend!

The Diary of a Real Housewife

Monday, April 27, 2015

"You're the 'balm'!" Teacher Gift Idea {with printable}


Grant loves his school. We were so lucky to find this daycare/preschool when we did. Grant has been there since he was about 6 months old, when we moved him from a daycare we were less than thrilled with. Most of the kids he's friends with now he's known his whole life. That makes me sad because he so loves his friends and this year when kindergarten starts, they won't all be together anymore. 

And Grant so loves his teachers! He's already asked us which one will be his kindergarten teacher. He looked confused and a little sad that none of the teachers he knows will be his kindergarten teacher. It kind of broke my heart. But it makes me happy too, because he's so happy at preschool and that is an awesome feeling. 

Every year for Teacher Appreciation Week (this year is May 4th-8th) I bake some stuff for the staff at school. They all work so hard with all the kids and definitely deserve a week of appreciation (though I hope they know we appreciate them every day)! This year I wanted to do something a little extra for Grant's teachers. While I've always felt like he's getting an early education where he is, with this year being preschool I've really noticed a change and can tell how much his teachers are doing to ready him for kindergarten.


I thought this was a fun little gift idea and I wanted to share it for anyone who might want to use it too.

What you need:

  • lip balm (you can use any kind, I used eos)
  • cellophane treat bags
  • filling (mine is shredded paper but I think tissue paper would be great too)
  • twine or twist ties to close the bag
  • gift tags 
  • optional: I added some fun hair ties as well
You just put it all together and add your gift tag when you're tying it closed. 


I think it's so fun and a nice little way of saying an extra "Thanks!". I tried several times to get Grant to write his teachers names on the backs of the gift tags but he still writes a little too big and kept running out of room. So we settled on me writing their names and he signed it with "Love, Grant". 


How cute are those tags?! I love the chalkboard look. Want to use them? You can get them HERE (for your own personal use).

I mentioned hair ties above. All of Grant's teachers are females and what woman doesn't love a good hair tie? So I added some hair ties on a 3x5 index card to the package.


These are hair ties I made because I found some adorable school themed elastic (but you could use any). I tried to personalize it to each teacher. For instance, the ones in the above picture are for a teacher that loves the beach. He has another teacher that loves tie-dye so I ordered some tie-dyed elastic for her hair ties. 

This is an easy little gift to put together and it's a nice little extra thank you to go along with the treats I plan to send to school that day. Grant can't wait to give them to his teachers. Since I made them early - to share this post with you - he asks often when he gets to bring them to school!

Skip To My Lou
Linking up for
Made by You Monday!

Saturday, August 11, 2012

New Recipe: Spicy BBQ Peanuts

I love food gifts. Making them, giving them, receiving them, all of it. So I'm always happy to find a recipe that can be used that way. This recipe comes from my Aunt Betty. She made a batch of these yummy peanuts for our 4th of July cookout. Husband loves spicy stuff and he loves BBQ sauce so I had to have the recipe, which she gladly shared with me...so I'm going to share it with you!

I spelled spicy wrong. Oops.

I think my favorite part of this recipe was that the only thing I actually had to get was the peanuts. Every other ingredient I had on hand. I love when that happens.

That's all you need!

Mix together everything but the peanuts

Then add your peanuts

Mix 'em up until all your peanuts are swimming in BBQy goodness

Spread them out on a greased baking sheet (or pan)

Mmmm...look at 'em. How great would those look in
a special package to give to someone for the holidays?
Spicy BBQ Peanuts

Ingredients
  • 1/3 cup BBQ sauce (I used Kraft original because it's what I had)
  • 2 tablespoons butter, melted
  • 1 teaspoon garlic powder
  • 1/4 to 1/2 teaspoon cayenne pepper
  • 1 jar (16 ounces) dry roasted peanuts


Directions
  1. In a large bowl, combine sauce, butter, garlic powder, and cayenne pepper.
  2. Add peanuts, stir until evenly coated.
  3. Transfer peanuts to a greased 13"x9"x2" baking pan.
  4. Bake [uncovered] at 325 degrees for 25-30 minutes, stirring every 10 minutes.
  5. Spread on wax paper; cool completely
Store in an airtight container.
Yield: 3 cups
Recipe Source: Aunt Betty :)

Notes/Suggestions:
  • I followed the recipe exactly, only using 1/4 teaspoon of cayenne because these were for my in-laws and I'm not entirely sure how spicy they like stuff. I tried a couple - not being a huge fan of spicy - and I didn't find them too spicy. If you want them with more heat definitely use more than 1/4 teaspoon.
  • Use the full teaspoon of garlic powder, I didn't find them overly garlicky (however, I'm a big fan of garlic so take that into consideration).
  • I can't wait to experiment with other BBQ sauces!
  • I put it in the recipe, but be sure to grease your pan! It makes life easier.
  • My 13x9x2" baking pan had brownies in it at the time, so I used a jelly-roll type pan instead and it worked fine. I just had to be a little more careful when stirring the peanuts.
Enjoy!!


Tuesday, June 19, 2012

Father's Day 2012

It was really Father's Weekend. We had our Father's Day get-together on Saturday instead of Sunday because my sister-in-law and her boyfriend were in town. So we had the two of them, my father-in-law and his wife over for a cookout (referenced in my previous post about the chocolate cake). I'm sorry to say that I have no pictures from the evening. I spent a lot more time in the kitchen than I did for Mother's Day and in our cleaning-up process the camera got put somewhere and it slipped my mind to get it out. But we all had a great time...especially Grant because he was the center of attention. He's always shy with people at first, but once he realizes that everyone wants to play with him then he's all about it.

Sunday, at Husband's request, we had a very lazy day. After being thrown up on by Grant (because he's sick - again) we pretty much sat around until Grant went down for his nap. Then Husband mowed the lawn and I ran some errands with Grant after he woke up but that was really the most effort that either of us put forth. But sometimes you really just need a lazy day.

Grant and his Daddy (and his new bat and ball from his Grandpa!)

After a very unusual nap #2, Grant remained upright only
long enough to walk from his room to ours so he could
cuddle with Daddy and watch nascar.

Then while Daddy finished watching the race (I'd sooner have
needles in my eyes), I took my little slugger outside
to practice hitting the ball. He may just be the next
Derek Jeter (only much, much cuter)!
I may have mentioned before that Husband is the worst person in the world to buy for. The only things he ever "needs" are clothes - which I've been forbidden to buy for him. And all of his "wants" are expensive enough that he just doesn't tell me - because he knows he won't get them. But for occasions like Father's Day, I think the gifts should be special and/or unique. Last year I got him a key chain with his favorite picture of Grant on it and "Happy First Father's Day 2011" on the back. It broke like a month later. Go me.

But this year, I think I picked a pretty good one. And Grant even helped me with it! Husband is a collector of sports cards and sports memorabilia. So I "made" a baseball with Grant's hand print on it and the date then put "Happy Father's Day" on the side:


 And then I put it in one of those cases so it would look like the real deal:

I think he liked it very much.
I hope that any of the Daddy's who may happen to stumble upon this post had a great Father's Day/Weekend!

Saturday, June 2, 2012

No Sew Blanket

I like to think I'm crafty. I'm into DIY. Maybe not as much as some, but I like it. Husband may dispute my claim on craftiness considering there are some unfinished yet to be completed projects strewn about the house. But I have finished some stuff too.

This post is about my unintended craft.

I have lots of weaknesses. One of those weaknesses is craft stores. I don't know what happens to me when I walk through those doors but I never leave one without buying something. Sometimes I need it. Sometimes those doors shut behind me and I look in my bag wondering "What am I going to make with that?". I really need a chaperon. On Monday (after our photo shoot with Elizabeth) I stopped at JoAnn Fabric. I went in for floral pins and pipe cleaners. Do you know what I left with? Pipe cleaners, two sheets of scrapbook paper (they have a purpose!)...and stuff to make a blanket. Let me explain because, you know what? When you get done reading this, you're gonna want to make one too.

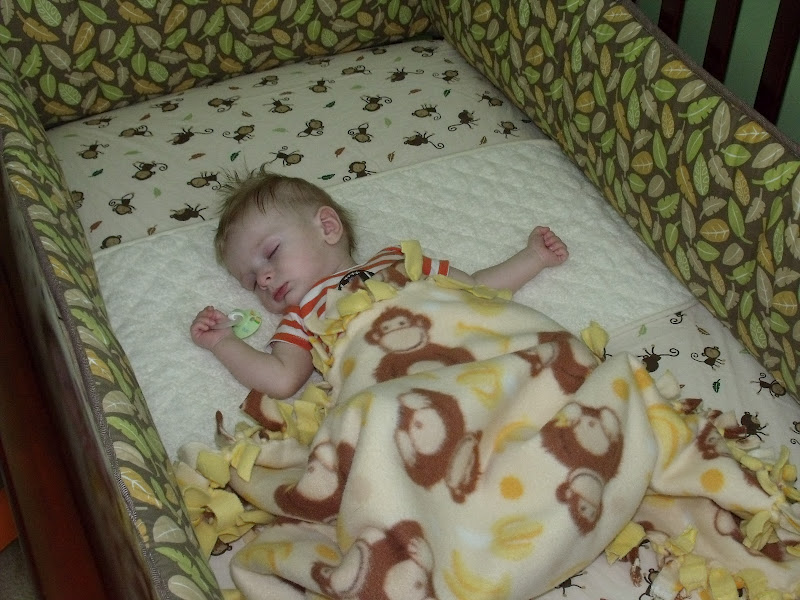
One of my most used baby gifts is a blanket made by my cousin's wife, Melanie. She made Grant this adorable fleece blanket with a monkey pattern on it (referred to as The Monkey Blanket). To this day it is one of only three blankets he will sleep with. Typically the blanket stays at day care and comes home on Friday's to be washed.

Grant sleeping with The Monkey Blanket (4 months old)
I've noticed in the past few months how much smaller the other two blankets look that Grant has been sleeping with. But when I try bigger ones, he cries until he gets his other blankets. So I made a mental note at some point to check out fleece to possibly make a bigger version of the blanket Melanie made for him.

Flash forward to my trip to JoAnn Fabric. Grant is in the cart and I see a huge section of fleece. I grab a bolt of fleece and say out loud "Oooh what's this?" I hear Grant gasp really hard. I look up and he is pointing at the fabric, mouth hanging open, not breathing. The fleece was monster truck print. It's like they knew I was coming.

So here's what you need:

I laid a sheet down on my living room floor to work on
this blanket so it wouldn't be covered in dog hair
before Grant ever got to use it.
 A pair of really good scissors (Warning: if your scissors kinda suck, you will regret starting this project less than half-way through!)
  • Ruler or tape measure
  • Two coordinating pieces of any fleece
                   - for a baby or toddler, buy 1 to 1 1/2 yards (in each of the two fabrics)
                   - for a child, buy 1 3/4 yards (in each of the two fabrics)
                   - for a teen or adult, buy 2 yards or more (in each of the two fabrics)

Most of these directions are copied directly from my instructions. Please note that any comments in red are from me and not the instructions :) Also, for Grant's blanket, I used 1 yard of each fabric. So for a baby blanket, I would think 1/2 yard of each would be perfect. But what do I know, this was my first blanket. 

And here is what you do:

1. Cut off the rough selvage edge on both sides. (This is the side that is machine finished, not cut. I only knew what they meant by this because mine said Made exclusively for Joann Fabrics alone one side.) Trim only as much as necessary, usually not more than 2 inches on each side. At this point, make sure that your cut sides are relatively straight. (They don't have to be perfect!) Do this on each piece of fabric.

2. Lay your fleece wrong sides together, with edges matching up (do this as best you can, mine did not lay perfectly together and when I finished you couldn't tell). Often times with fleece it's hard to tell which side is the wrong side and it often doesn't matter which side you use as the front or back.

3. Cut a 4x4" square (or a 5x5" square for longer fringe) - I did 3 1/2" for Grant's - out of each corner (through both layers of fleece) and discard. If you want longer fringe (not recommended for a baby or toddler), make your square bigger. It really does help to cut out your square from each corner before proceeding.


4. Cut all 4" (or 5" - or 3 1/2" like I did) strips into fleece at 1" intervals around all four sides.

You start cutting and you think "Cool, I'm making a blanket!"

You keep cutting and you think "I may never finish this."

Then you're all done cutting and you think "Holy crap, it's only half finished."
Then you tie over hand knots close to the blanket edge by using one strip from the front and one strip from the back to create the finished fringe edge. Repeat around all four sides. Then sit back and pat your crafty self on the back. You just made a blanket.

Tying the knots.
OMG it's done!


 Showing both sides. I love how they look together!


 Notes/Suggestions from the instructions:
  • To help make your strips approximately 1" wide (again, it doesn't have to be perfect), you can use a tape measure across the top of your four inch section so that you not only make your cuts about 1" apart but also only four inches deep.
  • To make the tying look more even, tie every other one, all the way around the blanket then flip the blanket over to tie the rest. That way neither side is really the front or the back.
  • Experiment with the way you tie the knots for different looks. You can make the knot show in either fabric as well as the fringe in either fabric. This one made no sense to me but I figured I'd include it in case it makes sense to any of you craftier people.
  • The nature of fleece makes two of the sides stretchy. Don't fear! Just be gentle when tying those sides (the selvage sides) so that your fringe isn't stretched out of shape. the knots do have to be tight to remain tied and keep the blanket together.
Notes/Suggestions from me:
  • I totally didn't read far enough in the instructions to get to the above notes or I would have done the flipping thing. I started with the corners (just because it made sense in my head) and worked my way around. Sometimes I skipped around because I thought if I crouched in one spot for too much longer I would, in fact, die like that.
  • My blanket is a bit of an awkward shape - long and skinny. That was unintentional but has worked out great because it perfectly fits in his crib, which is where I was planning to use it most anyway.
  • Melanie's blanket (very first picture in the post) has a solid "back" which made the fringe stand out more. Because of the fabrics I used, the fringe kind of blends in. So I guess if you want that part to stand out more, don't use two busy fabrics like I did.
  • I started this blanket with scissors that I thought were really good. Guess what? I was so wrong. Make sure you have good scissors. Buy a new pair if you have to. You'll be happy you did.
  • If you have any questions or something doesn't make sense, let me know. If I don't know the answer to the question, I can find out for you :)
Reading I love trucks and happily enjoying his new blanket made by Mama :)


Tuesday, May 1, 2012

For the Mama's

Last year I did this post about what Grant could get me for Mother's Day. Now, I'm not saying that I'm expecting anything this year (which is what my Hubby probably thinks I'm doing)...because not too long ago I was surprised with a snazzy new camera as an early Mother's Day present. But I've seen some other bloggers do posts about Mother's Day gift ideas so these are just some things that I think might be good gifts for the Mama's in your life :)

Husband rips on me every year when I tell him things I'd like for Christmas. I'd say 85% of my list is stuff from Etsy. Or as he calls it "all that homemade crap". I looove Etsy and am not the least bit ashamed to say I have a bit of an addiction to it.

For the coffee drinkin' Mama:

How adorable is this mug? I love the shape and color and the best part
is that they'll personalize that for you (like if you wanted it to say Mama
or Mommy instead). Super cute! Link HERE.

So fun for the iced beverage drinker. And I love the chalkboard
paint on it. Makes it very unique! Link HERE.

Coffee cup cozy - one of my favorites! And this seller
has so many fun color options to choose from. Link HERE.
For the jewelery lovin' Mama:

A mommy necklace. There are lots of Etsy sellers doing necklaces
like this, but this one is one of my favorites. Link HERE.
 
I love this acorn necklace! And you can personalize it with an
initial. Nothing really "mom-ish" about it, I just think it's
a really pretty necklace. Link HERE.

 How about a pretty ring personalized with your baby's name
and birthdate. And the seller can do the heart in a pink gold
if you're like me and not a fan of yellow gold. Link HERE.
 For the camera totin' Mama:

A really fun camera strap! Link HERE.


Another fun camera strap. Link HERE.


A camera bg! But this one is a splurge...it ain't cheap.
Link HERE.
For the readin' Mama:

A handstamped bookmark. I think she can do custom
orders too. Link to her bookmarks HERE.

An awesome e-reader cover! This was the one Etsy purchase that
Husband made for Christmas, he bought me that exact cover (from my list).
I love it so much! HERE is the link to the seller - she has lots of great patterns.

Related Posts Plugin for WordPress, Blogger...